Monday, 30 March 2015

Week 26: Easter Planning

This posts going to be a quick update.I started this week by writing down everything that needs to done. This is more or less my to do list from now till April 24th (the deadline for my work):
 As you can see there's a lot of work to do

Here's a  summary of what I've completed this week:

For Off The Map
Finished  my 3d flower models, unwrapped and completed the lightmaps for all models


For the Character Project
Evaluated my fire characters design:

Currently working on the paint-overs for my fire character:


Monday, 23 March 2015

Week 25 Part 2: Feedback and a Plan of Action

So on top of the regular off the map work Week 25 was also a week of feedback.  I received my first formal feedback of the year, then had my work review by Jolyon Webb,  an Art director for Natural Motions Games and a previous teacher on the course.

For the De Montfort review  I was assessed on the Container City Project and my Dichotomous Duo character project. For the Container City project I received a 55% mark and to be honest I'm not quite sure how to feel about that. In this project I had to do bits of everything to get a finished game level  out there by the deadline, rather than say focusing on one polished aspect, but it doesn't really seem like that's been reflected in my mark. I'm not 100% sure on how projects like these are marked, as engine work has only been introduced this year. However a large chunk of my time was spent building the level and getting it working in engine, but from the sounds of it I was marked mainly on the end assets that I produced, not any engine work. Either way I don't have  the opportunity to go back on this project, though I'm very much at a loss with how this turned out it's something I'll have to leave.

I was also reviewed on my character project. Being my favourite project of the year I'm glad that I got a decent mark for it overall, combined with my container city project I'm looking at a 2:2. for the year which is leaps away from my bare pass in first year, but still not where I want to be.The feedback I've been given was mostly about the technical aspects of my character model, The main issue that brought down my mark is the facial topology of my character which looking back at it now, is really terrible and doesn't make sense.

Yeruch....
If I can fix that up then I'm on track for the 2:2 but I asked what I could do to bring my grade up to a potential 2:1. The advice given was just to bring the texture up more, ad more details and really sharpen it up, so that's my aim over Easter. My only issue is trying not to completely redesign and redo my character as tempted as I am to do that, just because of the time constraints of this resubmission and the other projects I need to do over the Easter holidays.

What I'm currently working with
My second bout of feedback came mid week when Matt and Jolyon from natural motions visited to talk about the company and upcoming intern-ship opportunities. I showed him the work currently on my Art blog (http://sarahwrightworks.tumblr.com/) Which at the moment only shows the character based work that I've done ( This is a issue in itself as it's difficult to find a place for my other projects  as it they don't  fit with me wanting to be a character artist.)
Joylon focused mainly on my character project for the review.  I was told though my other sketches were ok and are a good thing to do in general, they're not what will get me hired, and make or break my portfolio, which makes sense. I'll keep sketching  but more with the mindset that those aren't the pieces that'll be judged at the end of the day (which means I can keep doing them purely for myself.)

 with my character project he recommended reworking my ice character as right now she looks like she's dressed for the cold, rather than being personified as ice, which I can see now. He also told me that I  need to put some finished projects up in my portfolio. I have a lot of work, but it's just not finished.  Getting some completed projects in there will show that  I can  commit to, and finish a project with consistency.I'd like to demonstrate that with my Dichotomous Duo character project, however with this comes a dilemma of whether I should push developing my Ice character, not just the fire character (really they should both be developed together to make sure they fit as a duo) For my resubmission hand in.

As a final note in my review, Jolyon pointed out the flat style I used for the profile of my Tumblr (and this blog) I suggested I do more of that.

This was surprising  because it is a simple style  and I guess the majority of feedback I've been getting this past year has been calling for more complicated things, not the simple stuff I do for fun. It was nice all the same to hear that someone does like that kind of thing though (besides myself of course =))


To wrap up this post and the week I made a quick action plan listing some of the tasks that I need to do to bring up my character project mark over Easter


Saturday, 21 March 2015

Week 25 Part 1: Off the map Recap

 Now that The White rabbit is modeled, skinned and in game I've moved on to modelling my chosen assets for the underground and garden area of the game. I have a few Victorian clocks to model, the "Eat me" cake, and the majority of the super sized flowers that'll feature at the end of the level. Each of these comes with different challenges. The details on the Victorian clocks I've chosen to model will most likely need to be projection mapped onto  a low poly model, from a potentially sculpted high polygon model. Something which I have little experience in. The "Eat Me" cakes will need to be concepted before modelling. Finally the texture of the flowers may prove challenging, since they will be fairly close to the screen the textures need to be detailed and realistic to fit the style that were going for. this I can do to an extent, the big challenge is if I can get this effect with low polygon modelling and if I can push the textures of the flowers further, trying to get the subsurface scattering effect onto the flowers for example.

Example of subsurface Scattering
Here's what I have so far in terms of my assets:
Current Bluebell Model
Current Clock Models

Friday, 20 March 2015

Week 25: Rabbit Rig

I figured out how to get my rig working!

I realised that the issue I had with my rig was due to an error in re-targeting the skeleton. The Unreal engine skeleton  and my Biped featured "twist" bones. When originally re-targeting my biped to the unreal skeleton I matched the twist bones of both skeletons together (ex. my bipeds upper_arm twist linked to the Ue4 upper_arm twist) When in fact they needed to be linked to regular (non twist) bones. No idea why though.

Here's a quick guide on the process, to help anyone who might be stuck on this, and so I don't forget how to do this:
  1. fully rig and skin your model. (Optional rename the bones in your model so they match the ue4 skeleton as bones of the same name automatically re-target to each other.)
  2. Export your model as an fbx with animation baked.
  3. Open up  your Unreal engine project, for this I'm using the default 3rd person view project.
  4. import the mesh into ue4 as a skeletal mesh with these settings:


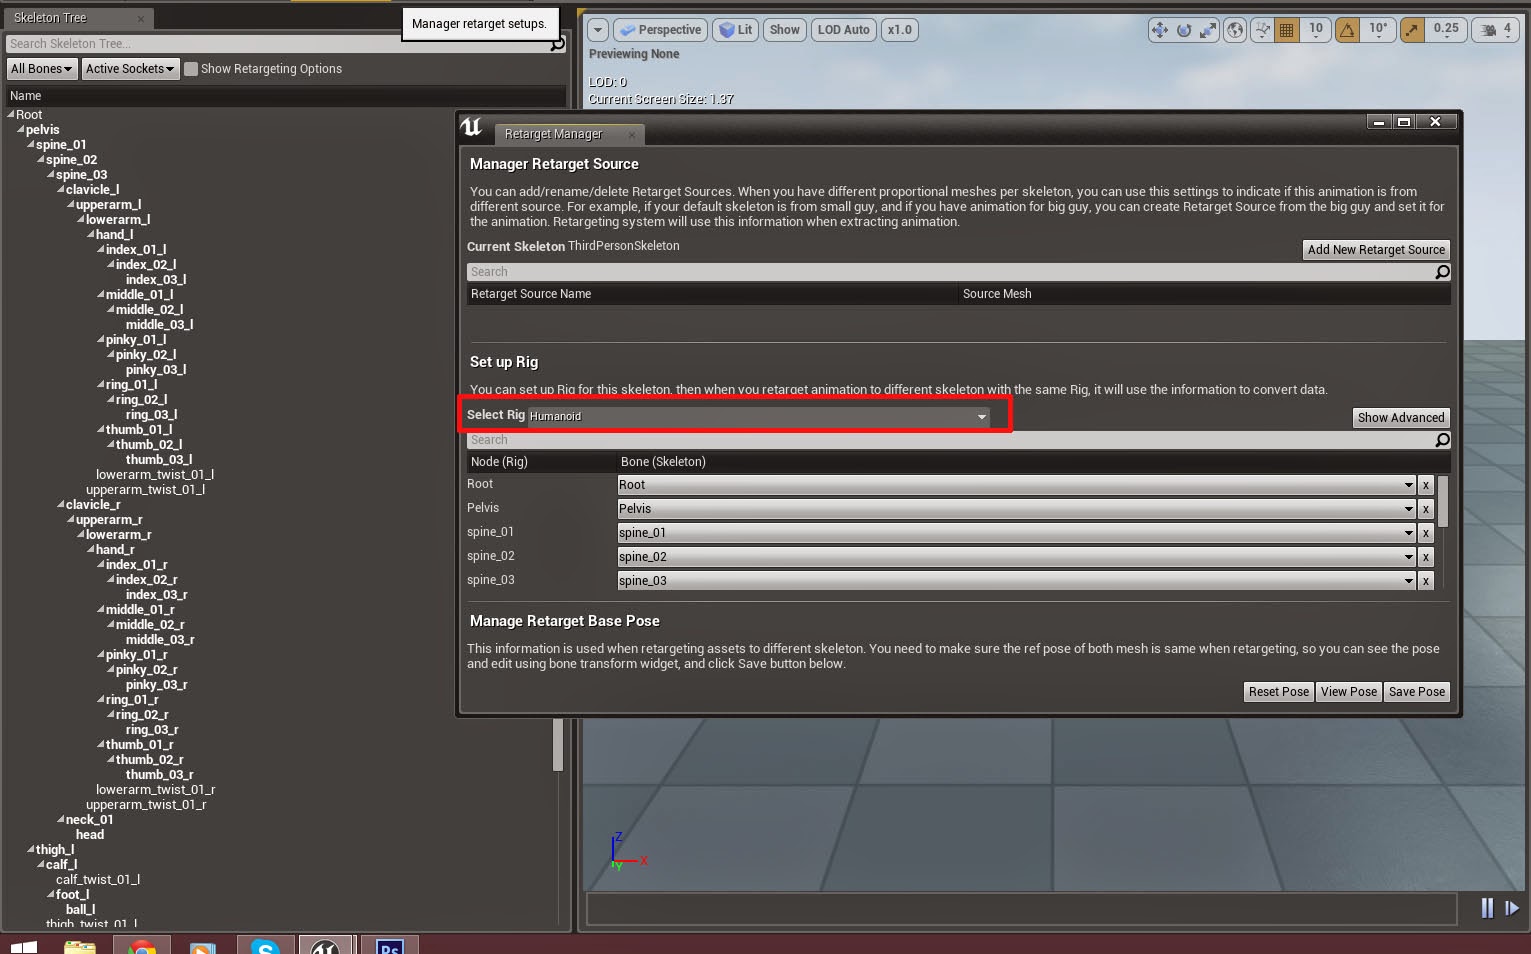
4. Double click the 3rd person skeleton (or "Hero TTP" skeleton), then in the re-target manager, target it to a humanoid rig.
Double Click


5.Still in the re-target manager edit the unreal mesh to match your  custom mesh's default pose (or the other way round, both work fine.) Once the mesh has been moved to the desired pose click "save pose" in the re targeting manager.
The desired A pose
6. Re-target your custom skeletal mesh to a humanoid rig in the re-target manager, match the skeletal mesh to the ue4 mesh, make sure the twist bones if you have them are matched to the body parts eg. upper arm twist is linked to the upper arm. NOT the meshes upper arm twist. This is what caused the T-rex arms on my mesh when I was testing my rig.

Note: Make sure to click the "show advanced" option to get everything.


7. in the skeleton tree tab with the re-targeting options selected. change the translation re targeting to skeleton rather than animation.

8. Select the 3rd person animation blueprint, right click, the select duplicate and re-target the blueprint. Now select your mesh from the list. You should now find the duplicated blueprint and animations in the folder containing your custom mesh


Your mesh now has the Unreal Engines animations rigged to it!

If you want to replace the default Playable character with you own follow these steps:

Select the character blueprint in the "blueprints" folder. In the mesh tab replace the default animation blueprint with the one linked to your custom character. Finally replace the mesh with your custom character

And you're done! =)

UPDATE: Your mesh might have shrunk after setting it to the playable character. I have no idea what causes this. You just need to rescale the mesh in the character blueprint viewport.


Sunday, 15 March 2015

Week 24- There's More than One way to Skin a Rabbit

So this week definitely did not go as expected. On Monday I was at the stage where my 3D White Rabbit model was complete, and unwrapped, ready to skin to a rig.


I knew the rigging stage of this would be difficult, but not for the reasons that I originally thought. I assumed that getting physics to work on the ears of my character would have been the main issue of this process. However I found that the initial rigging is a pain, as trying to get the skinned mesh to export properly into the Unreal Engine 4 and be able to  use the default animations provided in the engine is annoyingly difficult.

 I researched getting my model into engine and skinning it so me mesh could use the default UE4 animations. Unfortunately as it stands there were no clear step by step videos or documentation that could tell me how to do this. Most of the information I gathered would only work in Maya and the UE4 plugins made for that programme. After searching I could piece together enough information to get my model working in engine as the main player (So I can run and jump around a map as the White Rabbit). I imported the UE4 skeleton into 3Ds Max so I could skin my model to it for testing, however that proved to be difficult throughout the week. One of the problems is that there are Iks helpers and bone twist included in the UE4 skeleton, components that I had never come across before, and I assumed that they were just extras bones to weight, when actually they don't need to be weighted to the mesh. they're just there to help animation.

After beginning to rig my mesh from the UE4 skeleton I found that for some reason my mesh wouldn't skin properly,  It would stay in its t-pose regardless of the vertices weights I assigned to the mesh. For some reason this didn't matter with the legs,but not matter what I did the arms/shoulder area just would not rig. I also checked the weight of the ue4 mesh, which were similar to my own, and the position of the mesh before skinning was also in the T-pose. Despite all this my model's arms were still not working.
UE4 default player mesh


My mesh rigged to the UE4 Skeleton
 As I was near the end of the week at that time I didn't want to end up using a regular biped and animating this guy in 3ds Max since I'd already spent a lot of my time on this and didn't want to just give up and make it a waste, so I compromised. On Friday I replaced the UE4 skeleton with a  3Ds Max biped I however kept the same level of bones and the same names for said bones so UE4 would register it as the same skeleton (minus the IK helpers). I did this to hopefully fix any of the skinning issues I had with the original UE4 skeleton, but if not I could use this new skeleton to animate new movement sequences for the rabbit, as oppose to using the default animations. Here Is where I'm at:


As you can see the White Rabbit has T-Rex Arms....

As bad as this looks, I'm actually very close to getting this done (I hope) I just need to figure out why the arms are put in that position in UE4, they properly deform, there's just something off with the skeleton placement. I'd aimed to get this all finished and ready in engine by the end of the week, now with all of the problems I've come across I'm unsure of time frames. I'm going to attempt to fix this over the next day or two and hope it goes well, as I can't spend next week animating this from scratch if I can't get this to work. I have a hunch that exporting my mesh in the idle pose rather than a T-pose might fix this, but we'll see.

Onwards to next week!

Sunday, 8 March 2015

Week 23: Cutting back

Not a lot to report for this week, I've been continuing with my White rabbit model, and have completed my own targets of getting the 3D model built and unwrapped by the end of the week. So It's now all ready to be rigged and skinned, although I do need to do further research into this, as of this moment there doesn't seem to be an easy way of importing a rigged character into unreal, and have it use the default character animations, like I want.
The biggest change to the project happened on Thursday with our group tutor meeting where we were told to cut out a lot of our game. I figured this was going to happen, but it was good to get a second perspective on the reasons why. the main point to take away at them end of the meeting was that the game was just too large to be finished to a good standard and needed to be cut down. Afterwards I made sure to keep everyone together to sort out what we had, what we still needed to do and what could be cut out to form a solid plan of action. Now we've cut down a large chunk of our game and have thoroughly planned asset creation and time frames.
Current Asset list
Unfortunately whilst doing this we have found that we really don't have much time at all to finish our game, so we continued to cut out aspects that could be put back in after our university hand in. It's a little touch and go at the moment but I'm sure we'll get everything done.

Tuesday, 3 March 2015

Week 22: Rabbit and Gardens

Last week I began modelling the White rabbit of the Alice in wonderland story. Going through the motions of 3D modelling, business as usual.  I did get stuck on the look that I wanted for my characters face however. There were two ideas, he first is going the route of more cartoon like rabbits. modeling the rabbit head with its eyes at the front of its head. or to model the rabbit off of the real animal with binocular vision.
Eyes up front
Eyes to the side
I attempted to morph a human face around the shape of a rabbits head for the first iteration, but I ended up with a very creepy rabbit head, so I swiftly moved onto the binocular vision rabbit, taking reference from a wild hare.


I also dabbled in the possibility of using Nvidia Hair works with my model, as recommended by my teammate Jake Roddis unfortunately Unreal engine does not support this plug-in nor the hair and fur modifier in max. So I'll most likely just paint the rabbit fur onto my model,

I also painted a few concepts for our current garden level. Inspired by William Morris and William de Morgan I had the idea of taking some of the ornate plant designs of the Victorian era, modelling them in 3D and using those as the plants within our game's garden, as a second iteration I went for using real English garden flowers to populate the level.

William De Morgans Tile Designs
Our Current Level


Concepts
In the end I like the idea of  the illustrative flowers, I feel like they add add interest to the level however this style  does not appear at any other point with in the game so it would stick out way to much at the moment.To include these I think we would need to add more illustrative features in the prior levels,to make it work. Instead I'll I keep going and try to find some bright flowers to put into the scene.

I still have quite a bit to do in terms of both my White rabbit character and the garden but I'm slowly getting there. On to next week!